Improve SQL Performance

Recently we are assigned a task to improve the performance of a couple of SQL queries that run for 15 seconds and 30 seconds. At the beginning we were not so sure whether the performance can be improved anymore, given that there were about 80 million data in the database. But I have to admit that SQL Server is really powerful as eventually we are able to reduce the time down to 2 seconds and 6 seconds!

During the process, I have had a few interesting findings about SQL Server and learned a lot about troubleshooting SQL Server performance issues. Here I want to share a few tips on optimizing SQL statements I learned from the experience.

check Index first

We sometimes get ahead of ourselves and jump directly into analyzing SQL queries, but the answer to the performance issue may just lie on the indexing itself, so always check whether necessary indexes are presented. A good way to find out what indexes you need to is to use Dynamic Management Views to monitor system health and come up necessary indexes. With appropriate indexes in place, performance increase will be substantial.

Clustered vs. Non-clustered index

There are tons of articles about Clustered and Non-clustered index and their benefits. Knowing the difference between clustered and non-clustered index helps troubleshooting performance issue for sure. Here is a nice article explaining Clustered and Non-clustered indexes.

Here I would like to share a metaphor I like which helped me understand Clustered and Non-clustered index – Clustered index is like the page numbers of a book where the logic order of the pages is the same as the physical order of them in the book, e.g. page 1 is at the first and page 100 is the last page for a 100 pages book. On the other hand, Non-clustered index is like the Index page of a book where the logic order of the terms on the index page is not the same as their actual locations in the book. For instance, the word Apple is listed at the beginning of the index page but it may firstly appear on the last page of the book.

Analyze, trial and error

To really find out why a certain query is running slow, more information is needed.

VIEW Execution plan and set Statistics io

Execution plan can be quite helpful to figure out which parts of a complex query are taking time and how SQL server optimized the query. Though it does not provide a solution directly, it does provide some hints or directions on troubleshooting performance issues. SQL Management Studio or even Visual Studio now provide the ability to view execution plan. A good tool I find quite useful is SQL Sentry Plan Explorer which displays the execution plan diagram with much more information, for example, it displays the number of records processed above each line, which is very convenient.

Another quite handy tool, Statistics IO, displays statistics information for your query.  Set Statistics IO ON and information such as the number of scans will be displayed.

Break nested queries

However, execution plan may not  be very straightforward sometimes, especially for a complex query with many nested sub-queries. The large query will be optimized by SQL Server which makes the execution plan harder to understand. Instead of trying to figure out what SQL Server is doing,  a faster way for me is to just break the large query into smaller ones and test the performance of each of them. It is possible that SQL Server is not picking the best route to run the query and the ‘optimized’ query is actually running much slower, which is exactly what happened in my case. My query should only takes 2 seconds to run whereas the ‘optimized’ query by SQL Server takes 15 seconds.  Why? Optimizing query also takes time and SQL Server may just not find the best optimization in time.

If SQL Server is selecting a slower way to execute the query, there are a couple of workaround:

  1. Use OPTION (FORCE ORDER) at the end of the query to force the order of join to be the same as it is in the query statement.
  2. Break nested sub-queries into temporary tables. This way you can force SQL Server to materialize sub-queries.
Trial and Error

Another quick and easy approach is just try different ways of writing the same query. Swap IN with JOIN, change INNER JOIN to LEFT JOIN to EXIST,  or change Non-Unique Non-clustered index to Clustered index. Some changes just take a few seconds to make and they may just work. Once it works, you can research a bit on why or may just choose to forget about it if not in the mood. I happen to know someone (me) who is always not in the mood 🙂

How to write to Windows Azure Website’s application log and more

We struggled with Windows Azure website because we couldn’t write logs. Using Log4Net to write to log file as we used to do, does not work for Azure Website because of the limited file permission. We had to resort to email notification or Virtual Machine when we needed to debug Azure Websites, which was a big headache!

Fortunately, it is all over now. To write to the Application Log of Azure Website, just use System.Diagnostics.Trace name space and use method like TraceInformation, TraceError, TraceWarning to record different levels of log!


Trace.Wrietline("Log Verbose level log");

Trace.TraceInformation ("Log Information level log");

Trace.TraceWarning("Log Warning level log");

Trace.TraceError("Log Error level log");

Then just turn on the Application Logging and select a logging level for that Azure Website.

4-16-2015 5-41-11 PM

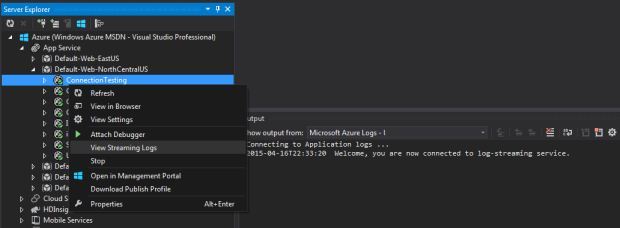
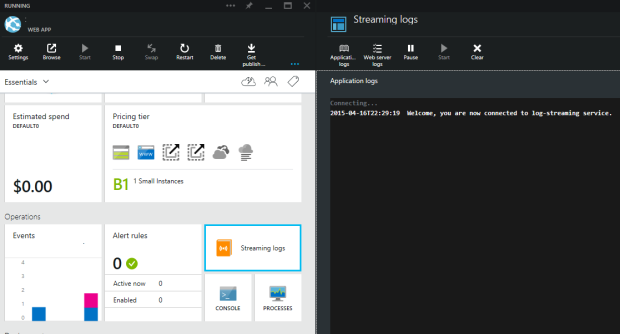
With this feature, it becomes much easier to troubleshoot Azure websites. Even better, Microsoft provides this streaming log function from which you can view application logs in REAL-TIME! (New Azure portal only)

4-16-2015 5-29-27 PM

Furthermore, here is something developers will definitely like – this streaming log is also available in Visual Studio, and you can filter the result using Regular Expression! (Latest version Azure SDK is required)

4-16-2015 5-33-57 PM

4-16-2015 5-36-13 PM

Since file logging is supposed to be turned off automatically after 12 hours, if you also want to log into a table storage, not a problem. You can set up a Azure Storage to hold the log.

4-16-2015 5-42-41 PM

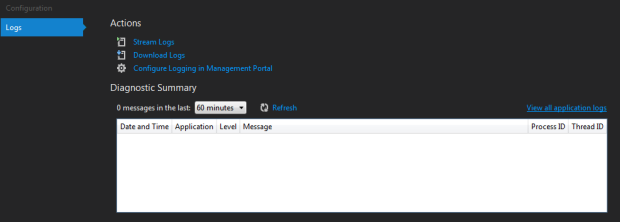
Click View settings of the Azure Website in Visual Studio.  In the Log tab, there  will  be a nice table view of the log. I do notice that it uses a lot of memory of the Azure Website. Just something to consider.

4-16-2015 5-43-48 PM

That’s what I know about logging to Azure Websites. Hopefully it is helpful. We use Azure on most of our web applications and I think it is just getting better everyday. Now with the ability to write application log for Azure Website, it just meets all of our needs, but there is still a huge set of exciting features we haven’t used. I look forward to exploring those someday!

Avoid client timeout on WebAPI call

If a WebAPI service takes a long time to complete, the caller, the client side, may timeout waiting for a response. There are several options to solve this issue, you can increase the timeout limit on the client side and web server side, or use a more persistent connection method like WebSocket and SignalR.

Here I propose a different way to avoid the timeout issue that allows the clients side to proactively check the result instead of passively waiting. The idea is pretty intuitive – since the client side times out on waiting for a response, why don’t just disconnect and check back the result later? So the solution is to disconnect with the client side as soon as the request is received and a WebAPI service is provided to enable client to check for the status of the processing. This way the client does not need to keep the connection open until the processing completes or times out. It can simply calls back every 5 seconds to check the result of the processing.

Here I am going to provide some sample code on how to achieve this. First, we create a Task class

public class Task
{
   public string TaskID;
   public Request Request;
   public Status Status;
   public Result Result;

   public void Execute(){
   // Do all sort of calculation and processing here
   // When done, sets the Status of the task to Finished.
   }
}

We then create a class to store tasks and to handle creation, retrieval, and deletion of tasks.

public class TaskManager
{
   private static List<Task> _TaskList = new List<Task>();
   // Create a new instance of Task object
   // and start a new thread to run this task
   public static Result CreateNewTask(Request request){
      var task = New Task(){
                TaskID =  System.Guid.NewGuid().ToString();
                .....
                };
      _TaskList.add(task);
      Thread thread = new Thread(task.Execute);
      task.Status = Status.Processing
      thread.start;
   }
   // This is also useful for purging tasks
   public static void RemoveTask(string taskID)
   public static Task GetTaskByID(string taskID)
}

Up to this point, we have our ‘backend’ built. Now we are going to create a WebAPI method to accept the request from the client side and a method for client side to check a task’s status:

[HttpPost]
public Result ProcessRequest(Request request){
// Submit a request which will be created as a task
// Return the TaskID back to client
}

[HttpGet]
public Result CheckStatus(String taskID){
// Call this every few seconds to check result
}

In this post I shared an idea to avoid client side timeout when calling WebAPI. We chose an approach that enables client side to check the result actively. Although it makes the client side a bit more complex, it is a reliable way to handle WebAPI calls that run a long time and also provides much more flexibility to the client side.

Design error message

Displaying error message is one of the most basic functions of an application, but can also be easily overlooked because we are often focused on the core functions of the application. There are numbers of ways to present the error messages, but in my opinion there are basically 3 objectives we want to achieve with error message and as long as the design can fulfill those, it is a decent one.

Objectives of error message

The 3 objectives of error message are to make it easier for the users to:

  1.  Know there is an error
  2.  Know what is having error
  3.  Know how to correct the error

In my past projects, form page and listing page are 2 most common pages that display error messages. I will share some ideas on each of them below.

Error message on form page

On a form page, I have pretty much used the following 3 ways to represent error messages:

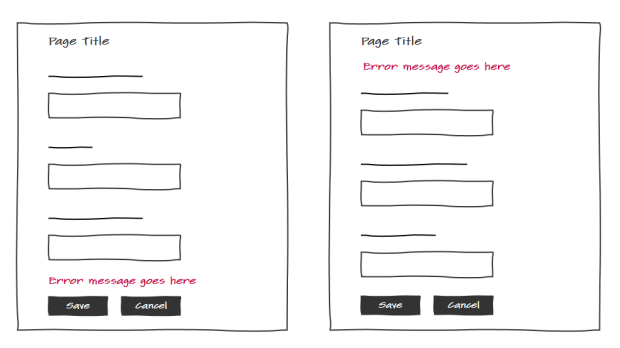
Error message on top or bottom

Good for a simple form. For example, login page.

2-18-2015 12-33-30 PM

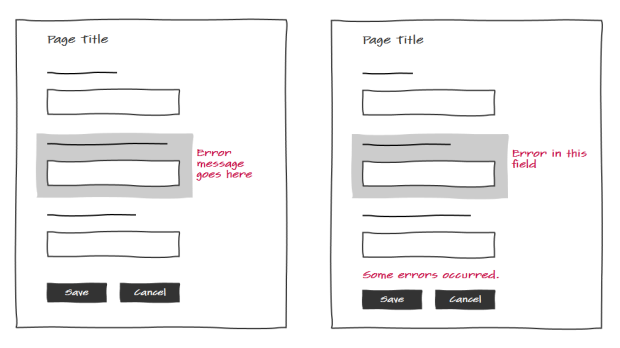
Error message next to a field

Useful to help users to find the fields that need to be corrected, but if the correction instruction is long, page’s layout will suffer.

2-18-2015 12-33-40 PM

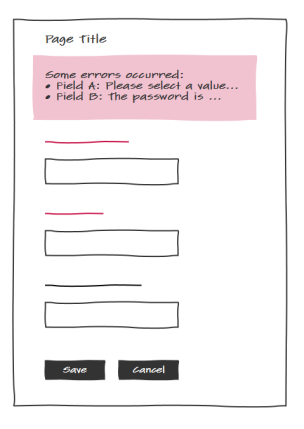
Error messages all displayed in a single block on top

Useful when instruction for correction is so long that putting it within the form will break the layout. Combined with highlighting the problematic fields can help users find the fields quickly and view all instructions in one place.

2-18-2015 12-33-48 PM

I feel these 3 ways are sufficient to cover all scenarios. I can just pick one of them based on the actual situation.

Error message on listing page

Listing page is a page that contains a list of records. This page type is different than a form page because the page is often long and each record often has its own action buttons, e.g. edit, delete, which could trigger error message. Because of this, there is one more thing needs to be accounted for – whether we need to maintain the current view of the user.

allows user stay or return to where she was

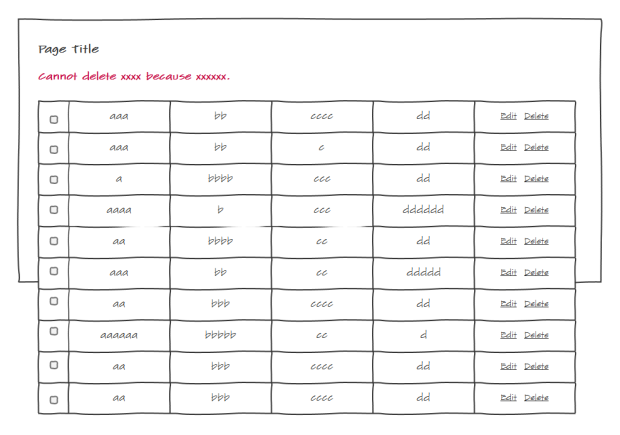
Consider a page with a very long list of records. When operating on one of the records, an error occurs and the page scrolls to the top or bottom where an error message is displayed. After reading the error, the user will have difficulty to find where the original record is.

2-18-2015 12-35-03 PM

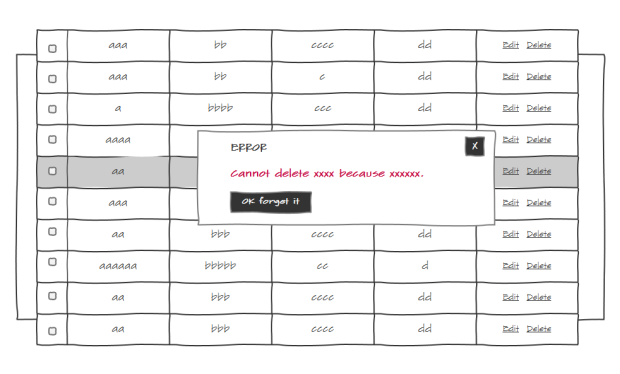
It is a good practice to always consider whether to maintain the user’s current view for it is very likely the user will continue to work on the record or the records next to it after seeing the error. In order to maintain the view of the page, I use an in-page pop-up window to display the error.

2-18-2015 12-35-30 PM

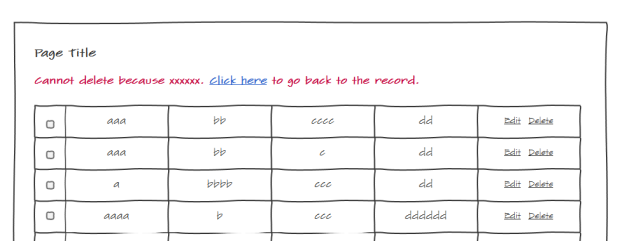
But of course there are other ways. For example, you can add a link in the error message to allow the user to go back to the problematic record.

2-18-2015 12-37-55 PM

There are downsides, however, the pop-up dialog requires the user to click the close button in order to continue, and the ‘link’ approach scrolls the page back and forth. But I will say they are decent designs as they fulfill all 3 objectives of error message.

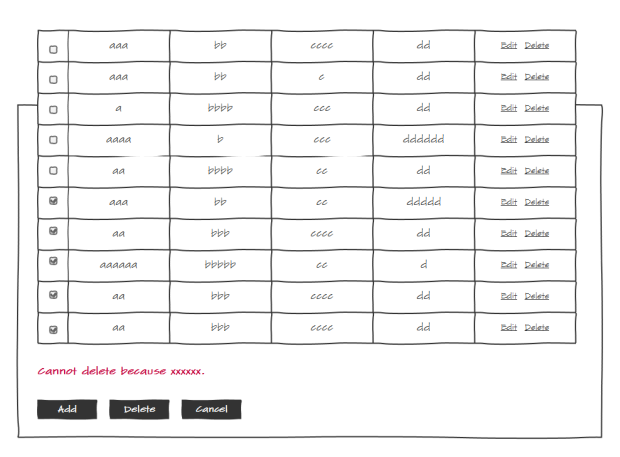
Listing page does not always require to maintain the view. For example, many listing pages offer action buttons such as a Batch Deletion button. Users can select multiple records and delete them at once. In the case, displaying the error message next to the action button is more common.

2-18-2015 12-38-25 PM

In this post I shared my thoughts on the error message’s objectives, which can be a starting point to develop a good error message design. Also I shared a few designs from my past projects. Hopefully these can inspire and help people on their own projects.

How flexible a system should be?

Flexibility has a real cost

It is common for people to ask UI designers to design a system as flexible as possible. Many believe that it is always better for something to be flexible. They think the more flexible the system is, the better the overall experience of the system. However, it is not always true. When we say this design is more flexible than the other one, we are saying that this design can handle more use cases, conditions, or scenarios. In other words, it performs more functions than a less flexible system. But, because it can do more, it often is more complex, which in turn decreases the usability of the system.

A great example from Universal Principles of Design about this tradeoff between flexibility and usability is the comparison between a Swiss Army Knife and corresponding individual tools. Swiss Army Knife has many attached tools that increase its flexibility, but in order to put all those tools in one tool, it sacrifices usability – users spend more time looking for the needed tool and then carefully digging out the tool. The complexity also has impacts on the Swiss Army Knife’s size and shape, which results in a less comfortable handle than corresponding individual tools.

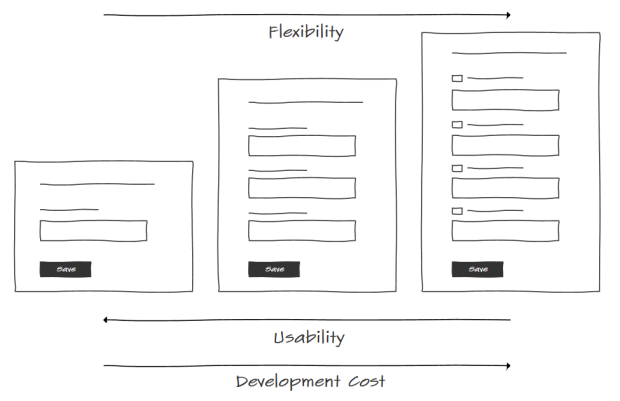
Below diagram shows that the more flexible a UI is, the more it costs.

2-5-2015 10-07-39 PM

So why flexible?

Knowing this relationship, it seems that flexibility only decreases usability — what benefit does it bring to the table? In my opinion, perhaps it is only beneficial to build a system flexible when you can’t anticipate future uses of the system. The flexibility helps to accommodate any unexpected future uses so the system does not need to be modified as much as an inflexible system. On the other hand, if you can clearly anticipate the need, flexibility is not needed. Why would add features you know that you are not going to need? There is a cost for keeping unneeded things, e.g. higher maintenance, more complex structure that makes changes difficult, etc. ‘You aren’t gonna need it’ (YAGNI) principle also presents several reasons for not adding features until deemed necessary. To list a few:

  • The time spent is taken from adding, testing or improving the necessary functionality.
  • The new features must be debugged, documented, and supported.
  • Any new feature imposes constraints on what can be done in the future, so an unnecessary feature may preclude needed features from being added in the future.

About building a flexible system vs. a specialized system, a really great example from Universal Principles of Design is a comparison between personal computer and video game console. We use computer to do all sort of things and can’t anticipate the future uses of the computer, thus the flexibility of it. Game console, on the other hand, is built merely for the need to play games. It is a specialized system which does not need the same level of flexibility as PC because we can fully anticipate the uses of it.

How flexible?

Knowing about these key factors, when approaching the problem of how flexible a system should be, we can tackle the problem via the following practices:

1) Clearly define the uses of the system.

Only when we clearly define the uses, can we know whether flexibility is needed. Requirement analysis itself is a topic that will require a whole series of posts, but knowing that this has to be done is critical.

2) Compare levels of flexibility with the costs in mind

As mentioned previously, increased flexibility has a cost in terms of usability and development effort. So we have to look at all factors together. What I often do is put design candidates with different level of flexibility side by side. Play with the different UI just as if I am a user to actually feel the pros and cons of each design.

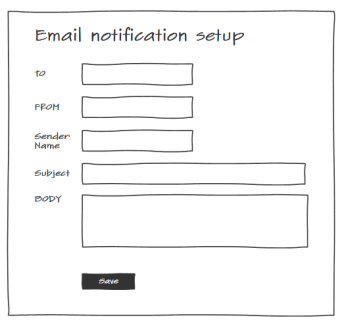
An example involves a screen for setup of sending system notification emails, e.g. error reports. Should the flexibility to be provided to allow the From Address and Sender Name to be edited?
2-5-2015 10-11-33 PM
Things like From Address and Sender Name, once are set up, may never change. Allowing these to be changed like in the first design below introduces more user errors and longer setup time, thus reduces usability. The second design does not allow these to be changed, but could cause some confusions – why these are read-only? Do I need a higher permission level to edit them? The third design allows these to be editable but also provides default/suggested values, which increases the flexibility without reducing much of the usability. By comparing these 3 designs together, a decision can be quickly made.
2-5-2015 10-14-11 PM
Aside from usability cost, we also have to deal with the cost of time and money. Consider the same designs above. If the first design costs $1, the second $100, and the third $1,000, the first design is mostly going to be favored. Development cost like this can have a great impact on the decision. What I often do is presenting all the cost factors to stakeholders and work out a decision together.

 3) Stop when you have to

During the system design, we will apply the first 2 steps and create designs with high flexibility and low cost. When design phase is over, we will hand it over to development team. Whatever level of flexibility we have in design at that point is the level the system will have. Every project has a time constraint. Even if you don’t want, it is going to decide the level of flexibility for you.

I covered a basic introduction to flexibility and a few practices we apply to our projects. There are numerous discussions on software flexibility out there. Many of them are around flexibility on software architecture, but the basics are still the same – Flexibility has a cost and it is beneficial when we can’t anticipate future uses. I hope that knowing about these basics is helpful!

How to use soapUI 5.0 to post JSON to REST Service

I wrote an article on the same topic but with version 4.5.1 soapUI back in 2013. To post JSON with an 4.5.1 version soapUI, you almost have to trick the application by explicitly typing in the media type ‘application/json’, and there are also a few settings that don’t really make sense. I’ve always forgotten the steps and had to go back to check my blog post.

Since then I have tried a couple of newer versions of soapUI for the same task, hoping it got more intuitive, but eventually I stuck with the 4.5.1 version because I didn’t see much improvement in those versions. Today I get my hands on the latest 5.0 version of the tool. Still free, great!
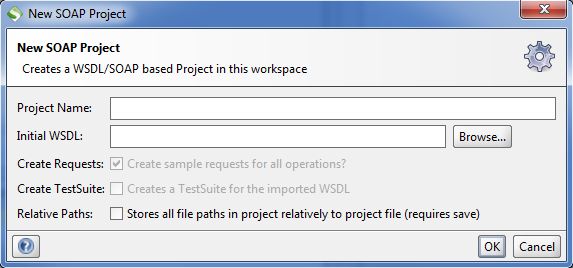
First, I crate a new SOAP project. The ‘Opens dialog to create REST Service’ option is gone. OK. It is already simpler from the first step.
1

Now my project is created, I right click the project and select New REST Service from URI.

2

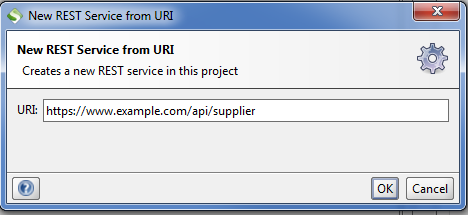
In the popup window, I put in the service endpoint where I am going to post my JSON to.

3

BOOM! It creates everything for me. No need to provide a Service Name, Parameter Name, or Method Name, everything is extracted from the endpoint provided. This is a great UI design because if out of nowhere it asks the user to provide a Service Name, she will be confused – What is the Service Name for?

4

It also automatically opens up Request1 where you can see it by default selects GET method.

5

I changed the Method to POST. It selects the correct Media Type for JSON posting. Just type in your JSON body and click the green arrow on the left top corner to post.

6

I am impressed by how easy the process becomes and glad that the development team is putting efforts on improving user experience, even though it is already a well-functional application. User experience is really a big part of software. A good UX can really change your life!

Create a fixed and interactive navigation sidebar with Axure 7.0 (Part II)

In my previous post, I talked about, as part of building a interactive navigation menu, how to detect the section the current view is in and highlight the corresponding navigation menu item. This post is going to finish the work by adding actions that make the navigation menu stay on top of the view.

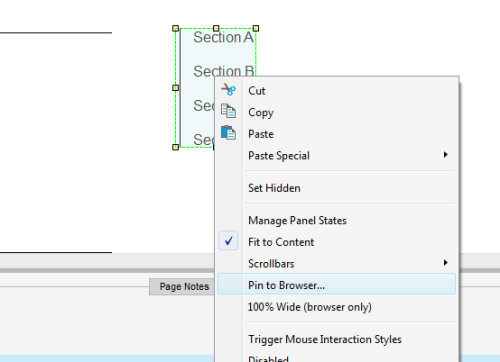
First, let me start by saying that a new feature is recently added to Axure that can pin a dynamic panel to browser. Right click the panel and you will fine the option.

11-11-2014 1-16-13 PM

However, this always keeps the same top margin between the panel and the top of the view. What we want is to only pin the panel in place when it is about to be out of the view. In other words, we want the panel to start moving along with the page when it is about to be scrolled out of the view.

So how do we know if the panel is about to be scrolled out of the view? This can be detected by checking whether the distance scrolled vertically is greater than the y position of the first horizontal line (our panel’s top edge aligns with the line). This is going to be the condition of our action.

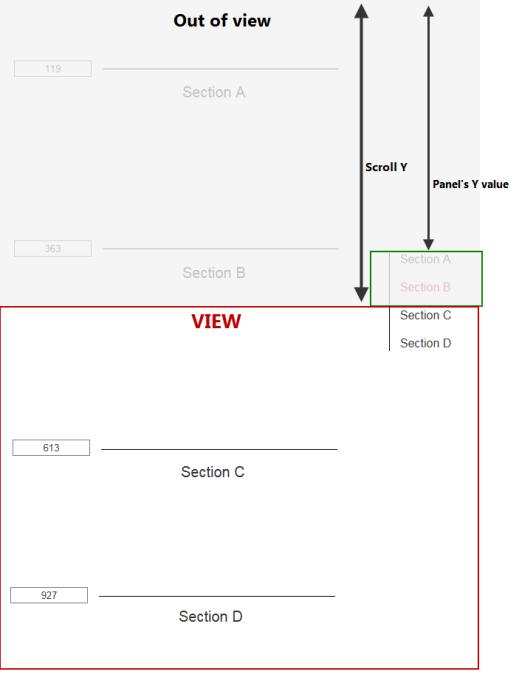
When the page is scrolled past the first line, part of the panel will be out of the view. How do we pin it in the view instead? We just need to immediately move that outside part back in. In other words, we need to move the panel down by a distance that equals to the height of the part that is out of the view. Below diagram shows how we can calculate this distance. Scroll Y is how much has been scrolled. Panel’s Y value is the distance from the top of the page to the top edge of the panel. The difference between these 2 variables is the distance we need to move the panel down, so that the green part is back in the view.

11-11-2014 1-41-08 PM

Once we are clear on the approach, we can add a new action on ‘OnWindowScroll’ event that moves the panel back in when it is scrolled out of the view. The Target here is the panel itself because we are moving it. It is a quick way to get a widget’s property.

11-11-2014 2-03-30 PM

Note that I added 20 pixels of top-margin at the end. It is not necessary. But if you added some margin, you need to remove the margin once the view is back to the initial position, so that the panel is also back to its initial position. Below I have another action that moves the panel back to its original position when the page is scrolled back to top.

11-11-2014 2-08-17 PM

Here is a demo of the navigation menu.  Hope this helps!

Create a fixed and interactive navigation sidebar with Axure 7.0 (Part I)

UI design is part of my daily work and I use Axure to build mock up screens all the time. Recently I have updated the tool to its latest 7.0 version and noticed that some of the new features it offers are quite useful. What I found to be the most useful are the ability to pull or push adjacent widgets when a widget is hidden or shown and the ability to break away the first state of dynamic panels.

My wife, a UX designer, thinks Axure is really counter-intuitive and she prefers to use Adobe Muse. I have to agree that in terms of building animation and graphic intense web apps, Adobe Muse is a better choice than Axure, but I think they are focused on different things. Axure is more focused on building a prototype for tools and enterprise applications. Just look at what it offers – page and widget events, repeater, dynamic panels –  all of these make it easier to build up pages with complicated logic.

In this article I am going to describe how to use Axure to build a navigation sidebar that stays on the page and  highlights the section the user is current in, which seems to be a feature that requires some logic controls. Ironically, my wife says this can be done easily with Muse.. I hope it is not true! On the bright side, this can still be done with Axure, just with a little bit more effort.

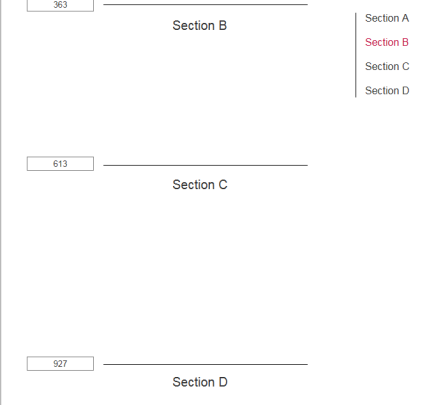
So this is what we want to achieve – a navigation sidebar that first appears on the right top corner. When page is scrolled and the sidebar is about to be out of the view, it starts to stay on the top. The menu items in the sidebar become selected/highlighted when the page is scrolled to the corresponding sections. Here is a demo.

10-13-2014 10-56-00 PM

Instead of jumping into the detailed steps, I think it is beneficial to firstly explain the solution a bit. To make this work, the central idea is to store the Y position of each section as the text of a hidden widget, which is the rectangle to the left of each section on my demo, and then when the window is scrolled, compare the Window.scrollY with the hidden widget’s text to determine whether the page is current scrolled into that section. The trick here is that you can compare a variable value with a widget’s text.

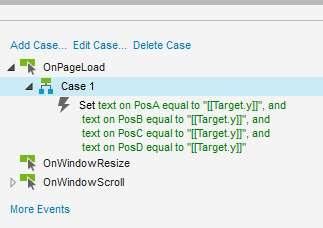
Now, the first step is to of course put all the widgets on the page including the widgets for storing the Y positions. They will later be hidden. I put the widget on the top of each section so that their Y position is the section’s Y position. Then on the onPageLoad event listener, save the Y position of each widget. In the below screenshot, I named these widget as PosA, PosB, PosC, and PosD. Note the ‘Target’ here is the hidden widget itself. It is a new feature introduced in Axure 7.

10-13-2014 10-31-22 PM

These actions effectively store the Y location of each section. Next we will add more actions so that when the page is scrolled to a section, the corresponding menu item is selected.

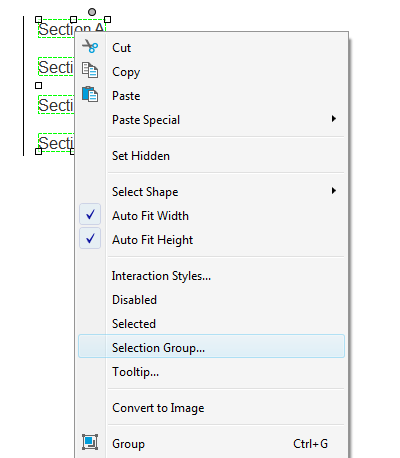
First assign menu items with a selection group to ensure only one item can be selected at a time.

10-13-2014 6-56-51 PM

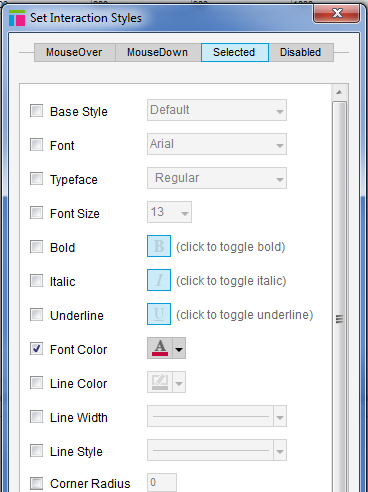
Also set the menu items’ Selected style by selecting ‘Interaction Styles…’ in the above menu and go to Selected tab to define a Selected style.

10-13-2014 10-50-06 PM

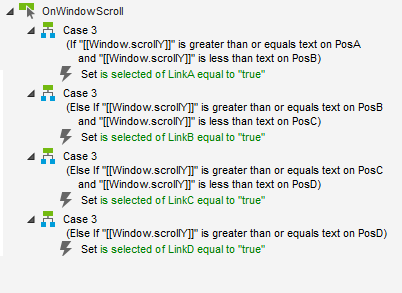
Here comes the most important step. On the page’s OnWindowScroll event listener, add the following actions. These actions compare the Window.scrollY (how much the page has been scrolled) with the position of each section to determine whether the page is currently scrolled in the section

10-13-2014 10-50-54 PM

These steps are the essential parts for achieving the interactive navigation sidebar. However, without the sidebar staying on top of the view, we cannot see the end result (because the side bar is out of the view). Next time I will finish the tutorial with steps of making the side bar fixed in place. Stay tuned!

Use Windows Authentication on WCF service behind a SSL handler

After my last blog post about using Cert-based Message security for WCF web service, we started to look into using Windows Authentication for a different system that also sits behind a load balancer/SSL handler. Windows Authentication provides a much easier integration option – client side can simply provide a domain user account to be authenticated, where as in Cert-based authentication, each client needs to install a certificate. This increases difficulties for clients to develop against the service and is our motivation to look into utilizing Windows Authentication instead.

With the experience of cert-based authentication, I was pretty sure it wasn’t going to be easy to use Windows Authentication in a load balanced environment. First thing we tried of course is to follow Microsoft’s guide to use wsHttpBinding with Windows Authentication and Message Security, with one different is that our client needs to use Transport security instead of Message because it must use HTTPS.

Like we thought, this setup didn’t work because the service expect to use Message security but the client is using Transport security. We then tried TransportWithMessage credential and some other settings. None of them works. We were stuck on this error message “The HTTP request is unauthorized with client authentication scheme ‘Ntlm’. The authentication header received from the server was ‘Negotiate,NTLM’.“, which unfortunately is one of those error messages that do not make sense.

In the painful process of pursuing truth, we came across some post raising the problem level to the load balancer level, which discouraged us to keep researching. It seemed more reasonable to find an alternative at that point, and we did find out that using BasicHttpBinding with Windows Authentication and TransportCredentialOnly worked in our environment.

Here is our client setup:

<basicHttpBinding>
  <binding name="BasicHttpBinding">
   <security mode="Transport">
    <transport clientCredentialType="Basic" />
   </security>
  </binding>
</basicHttpBinding>

Service setup:

<basicHttpBinding>
  <binding name="BasicHttpEndpointBinding">
    <security mode="TransportCredentialOnly">
      <transport clientCredentialType="Basic"/> 
    </security>
  </binding>
 </basicHttpBinding>

The problem with this is that the credentials of the client is passed in clear text. Although message before the land balancer is protected by HTTPs, still we want a true end-to-end protection on the credentials. So this solution is off the table. We decided to go back to our original plan.

I will just skip to the end of the story because I like magic!… We eventually found a solution that worked in the load balanced environment. Custom binding once again saved the world! I didn’t find any article about this configuration, which makes it more important to share it with everyone.

Client side:

 <customBinding>
  <binding name="customBinding_WindowsAuth">
    <textMessageEncoding>
      <readerQuotas />
    </textMessageEncoding>
    <security authenticationMode="SspiNegotiated"></security>
    <httpsTransport  authenticationScheme="Anonymous"  
      proxyAuthenticationScheme="Anonymous" useDefaultWebProxy="true">
    </httpsTransport>      
  </binding>
</customBinding>

Service side:

<wsHttpBinding>
 <binding name="WsBindingConfigration" >      
   <security mode="Message">
     <message clientCredentialType="Windows" 
     negotiateServiceCredential="true" algorithmSuite="Default" 
     establishSecurityContext="false"/>
   </security>
 </binding>
</wsHttpBinding>

Use Message security on WCF service behind a SSL handler

Configuring WCF web service’s security is just tedious. Microsoft has been trying to make it simple by removing many configuration settings in .NET 4.5 but it could still get messy if you need to touch the security part – There are many bindings and there are Message, Transport, and TransportWithMessageCredentials security modes, each with their own client credential types, not mentions all those authentication modes for Custom Bindings such as AnoymousForCertificate, IssuedTokenForCertificate, IssuedTokenOVerTransport, etc.

Developers are developing WCF web service on the platform from Microsoft. They are the users of the platform in this sense. It’s supposed to be user friendly and intuitive. But I found it is quite difficult to select the right security configuration in different scenarios. Even after you read the documentation from Microsoft carefully, you sill have a very limited idea on how these security modes differentiate from each other.

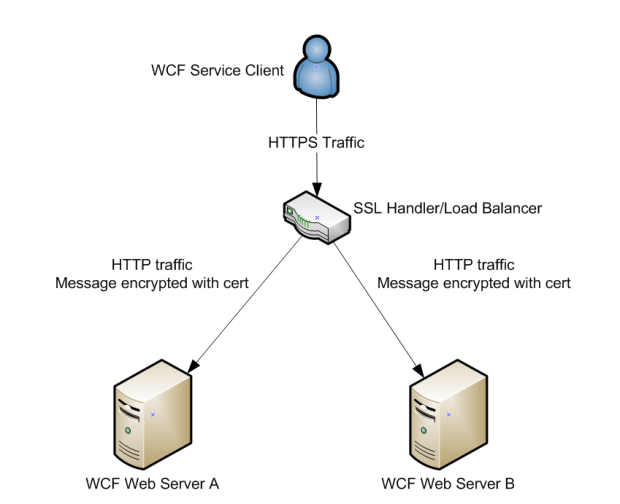
This post is aimed to cover one small scenario of using WCF security – using a WCF web service with cert-based Message security behind a front-end SSL handler. Often times, your web servers are behind a load balancer that handles all SSL requests and pass in HTTP requests to your IIS. Below is diagram showing the infrastructure.

8-8-2014 4-17-55 PM

At first glance, it seems pretty straightforward – Transport security mode covers SSL security, Message security mode handles message encryption. Hey there is a security mode just for the two modes combined: TransportWithMessageCredentials . We should be able to just use that on both client and service side to achieve what we want, right? However, you just can’t be so optimistic in the world of software development.

This configuration won’t working. First of all, since the service is not really receiving HTTPS requests, Transport mode should not be used. We just need Message security. So below is the correct configuration on service side.

<wsHttpBinding>
     <binding name="WsBindingConfigration">
     <security mode="Message">
      <message clientCredentialType="Certificate" negotiateServiceCredential="true"
algorithmSuite="Default" establishSecurityContext="false"/>
     </security>
    </binding>
  </wsHttpBinding>

The client side is where it gets tricky. I can’t really explain why TransportWihtMessageCredential doesn’t work. Something goes wrong under the hood. But here is the configuration worked for me. Use MutualSSLNegotiated mode and CustomBinding!

<customBinding>
        <binding name="customBinding_CertAuth_ClientService">
           <security authenticationMode="MutualSslNegotiated">
           </security>
           <httpsTransport authenticationScheme="Anonymous"
proxyAuthenticationScheme="Anonymous" useDefaultWebProxy="true">
           </httpsTransport>
        </binding>
</customBinding>

It took me a long while to research and trial and error to finally figure this out. Many development teams don’t have the time to mirror the environments of their clients, which makes finding and troubleshooting issues like this difficult. But hopefully this post can help you out.